X++

Validate AIF ports if they are running in AX

It may happen that AIF ports are failing due to an error, or they do not activate when the AX AOS instance gets started. There is a way to validate AIF ports if they are running correctly using a combination of X++ code and a PowerShell script that you may find below.

Add the following to the Global class collection and do a Full CIL:

public static client boolean WIK_notStartedAIFPortExists()
{
    #Aif
    AifInboundPort  port;
    Map             serviceStatusMap;
    str             serviceTypeName, status;

    boolean ret             = false;
    boolean isPortStarted   = false;

    serviceStatusMap = appl.getServiceHostStatus();


    if (serviceStatusMap)
    {
        while select Name from port
        {
            serviceTypeName = strFmt('%1.%2', #DotNetServiceNamespace, port.Name);

            if (serviceStatusMap.exists(serviceTypeName))
            {
                status            = serviceStatusMap.lookup(serviceTypeName);
                isPortStarted     = strStartsWith(status, #WcfCommunicationState_Opened);

                if (!isPortStarted)
                {
                    ret = true;
                    break;

                }
            }
        }
    }

    return ret;
}

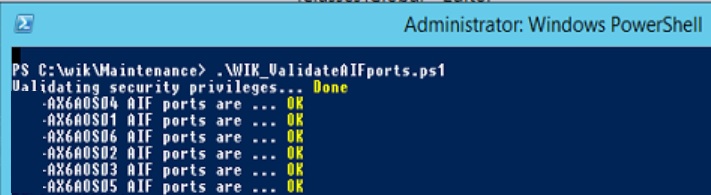
And here is the PowerShell script to validate AIF ports. Please make sure you provide a comma-separated list for the AOS names, and a correct path where the Business Connector DLL could be found. Also you might want to provide credential details for the AX login if the user running the script does not have access.

# Set variables

$computerName = "TESTAOS01,TESTAOS02" -split ','
$AXBCpath = "C:\Program Files (x86)\Microsoft Dynamics AX\60\Client\Bin\Microsoft.Dynamics.BusinessConnectorNet.dll"

# Validate Administrative privileges and Elevated command prompt

Write-Host "Validating security privileges... " -NoNewline

if (-NOT [bool](([System.Security.Principal.WindowsIdentity]::GetCurrent()).groups -match "S-1-5-32-544"))
{
    throw "You must be running the script in an Elevated command prompt using the Run as administrator option!"
}

if (-NOT ([Security.Principal.WindowsPrincipal] [Security.Principal.WindowsIdentity]::GetCurrent()).IsInRole([Security.Principal.WindowsBuiltInRole] "Administrator"))
{
    throw "You do not have Administrator rights to run this script!`nPlease re-run this script as an Administrator!"    
}

Write-Host "Done" -ForegroundColor Yellow

# Script for checking AIF

[ScriptBlock] $global:CheckAIFPorts =
{
    param ([string] $AXBCpath)
    try
    {
        $bcassembly = [Reflection.Assembly]::Loadfile($AXBCpath)      
        $ax = new-object Microsoft.Dynamics.BusinessConnectorNet.Axapta
        $ax.logon("","","","")
        $xSession = $ax.CreateAxaptaObject("XSession")   
        $AOSName = $xSession.call("AOSName")
        
        Write-Host -NoNewline "$AOSName AIF ports are ... "
        if ($ax.CallStaticClassMethod("Global", "WIK_notStartedAIFPortExists") -eq $false)
        #if ($ax.CallStaticClassMethod("Global", "isaos") -eq $true) #"WIK_notStartedAIFPortExists")
        {
            Write-Host "OK" -ForegroundColor Yellow
        }
        else
        {
            Write-Host "NOT OK" -ForegroundColor Red
        }
        $logedOff = $ax.logoff()
    }
    catch [Exception]
    {
	    Write-Host "Failed" -ForegroundColor Red
	    Write-Host $_.exception.message
    }
}

$Session = New-PSSession -ComputerName $computerName
Invoke-Command -Session $Session -ScriptBlock $CheckAIFPorts -ArgumentList "$AXBCpath"
Remove-PSSession -Session $Session

validate AIF ports


By |2016-08-17T09:02:35+02:00August 17th, 2016|Categories: AX 2012|Tags: , , , , |2 Comments

Table Delete actions in code compare window

I am sure all fellow developers have faced the frustrating problem of not being able to insert certain objects when importing an XPO or comparing different models, layers. Today I will show you how can you insert the Table Delete actions in code compare window for AX 2012 R3.

Modify \Classes\SysTreeNode\mergeInsertSubnode method in the AOT as per below:

(more…)

By |2016-03-30T15:24:06+02:00March 30th, 2016|Categories: AX 2012|Tags: , , , , , , |3 Comments

Enable batch e-mail alerts from code

The setup of notifications for batch jobs are quite simple if you know where to look. To enable batch e-mail alerts from code all you need to do is create new records under \\Tables\BatchJobAlerts with the right flags for an AX user, who has their e-mail address set in the User Options correctly.

The following X++ Job is self-explanatory on how to enable batch e-mail alerts from code in case of Cancellation or an Error:

static void WIK_enableBatchJobAlerts(Args _args)
{
    #Batch
    Map             alertsMap;
    Map             alertsEntity;
    BatchJob        batchJob;
    BatchJobAlerts  batchJobAlerts;
    
    while select batchJob
        where (batchJob.Status      == BatchStatus::Executing
            || batchJob.Status      == BatchStatus::Waiting)
            // Optional filtering for dedicated batch service account only
            && batchJob.createdBy   == 'axbatchuserid'
        notexists join batchJobAlerts
            where  batchJobAlerts.BatchJobId    == batchJob.RecId
                // Include all batch jobs where e-mail alert is disabled for our account
                && batchJobAlerts.UserId        == batchJob.createdBy
                && batchJobAlerts.Email         == NoYes::Yes
    {
        // This can be called any number of times to alert multiple users even with different settings
        alertsMap = BatchJobAlerts::addAlertsToMap(
            batchJob.createdBy, // Whom to alert
            NoYes::No,          // Ended
            NoYes::Yes,         // Error
            NoYes::Yes,         // Canceled
            NoYes::No,          // Popup
            NoYes::Yes          // E-mail
            );
        
        BatchJobAlerts::saveAlerts(batchJob.RecId, alertsMap);
        
        alertsEntity = alertsMap.lookup(batchJob.createdBy);
        
        info(strFmt('Enabling alert (Ended=%1 Error=%2 Canceled=%3 Popup=%4 E-mail=%5) for user <%6> and batch <%7>',
            enum2Symbol(enumNum(NoYes), alertsEntity.lookup(#batchJobEnded)),
            enum2Symbol(enumNum(NoYes), alertsEntity.lookup(#batchJobError)),
            enum2Symbol(enumNum(NoYes), alertsEntity.lookup(#batchJobCanceled)),
            enum2Symbol(enumNum(NoYes), alertsEntity.lookup(#popup)),
            enum2Symbol(enumNum(NoYes), alertsEntity.lookup(#email)),
            batchJob.createdBy,
            batchJob.Caption
            ));
    }
}

The output will be something like this:

Enabling alert (Ended=No Error=Yes Canceled=Yes Popup=No E-mail=Yes) for user <sa.axbat> and batch <ADMIN – Due date alerts – every 15m>

By |2016-02-17T16:03:08+01:00February 17th, 2016|Categories: AX 2012|Tags: , , , , |1 Comment

Improve AX performace by fixing bad Query plans

Sometimes the Purchase invoicing department has complained that posting took a very long time to complete. We could correlate this with the slow performing SQL statements alert explained in my previous post to identify the cause, now it is time to improve AX performace by fixing bad Query plans. My colleague, Peter Prokopecz provided some great insights on resolving this problem.

Either an AX trace, or the SQL alert could reveal the bad code. In our case it was the standard functionality of matching Tax transactions with the General journal entries, which can be found in \Data Dictionary\Tables\TaxTransGeneralJournalAccountEntry\Methods\create. It is a very large insert_recordset statement with multiple inner and exists joins:

taxtransgeneraljournalaccountentry

(more…)

By |2016-01-08T17:57:45+01:00January 8th, 2016|Categories: AX 2012|Tags: , , , , , , , , |4 Comments

Default AX model for all users

If you want to set the default AX model for all of your active user accounts on a certain layer, you may run the following job to do so.

Whenever a new developer joins in, you may include running this job in your account creation process to make sure they do not try to check in code to the wrong place, but only to your correct default AX model.

Do not forget to change the layer and the name of the model.

static void WIK_UpdateDefaultModel(Args _args)
{
    UserInfo                userInfo;
    UserInfoStartupModel    userInfoStartupModel;
    UserInfoStartupModel    userInfoStartupModelDB;
    UtilEntryLevel          layer = UtilEntryLevel::cus;
    ModelId                 modelId = any2int((select firstOnly Model from SysModelManifest where SysModelManifest.Name == 'MyModel').Model);

    ttsBegin;

    while select userInfo
        where userInfo.accountType  == UserAccountType::ADUser
        notexists join userInfoStartupModel
            where  userInfoStartupModel.UserId  == userInfo.id
                && userInfoStartupModel.Layer   == layer
                && userInfoStartupModel.ModelId == modelId
    {
        userInfoStartupModelDB.clear();
        userInfoStartupModelDB.initValue();
        userInfoStartupModelDB.Layer            = layer;
        userInfoStartupModelDB.UserId           = userInfo.id;
        userInfoStartupModelDB.ModelId          = modelId;
        
        try
        {
            if (userInfoStartupModelDB.validateWrite())
            {
                userInfoStartupModelDB.insert();
            }
            else
            {
                throw error('We have a problem');
            }
        }
        catch
        {
            exceptionTextFallThrough();
        }
    }

    update_recordset userInfoStartupModel
        setting ModelId = modelId
        where userInfoStartupModel.Layer    == layer;

    ttsCommit;
}

MSDN link for UserInfoStartupModel: https://msdn.microsoft.com/en-us/library/userinfostartupmodel.aspx

By |2015-12-22T14:47:21+01:00December 22nd, 2015|Categories: AX 2012|Tags: , , , , |1 Comment
Go to Top